Support
Camera setup
Setup instructions
Canon R100 – initial settings
Follow these instructions to get your Canon R100 ready for your Slabsmith photostation.
| 1) Set the camera to “Manual” mode | 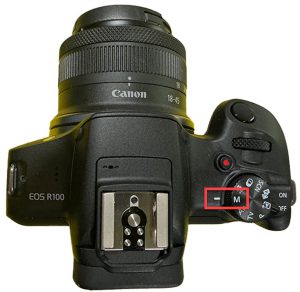 |
||||||||
| 2) Turn on Camera | 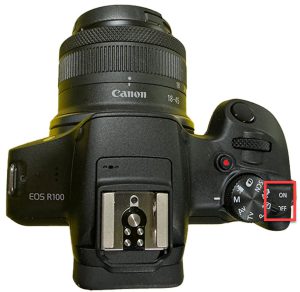 |
||||||||
| 3) Select the “MENU” button | 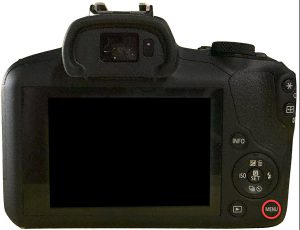 |
||||||||
| 4) You will see the initial screen | 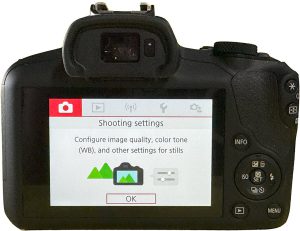 |
||||||||
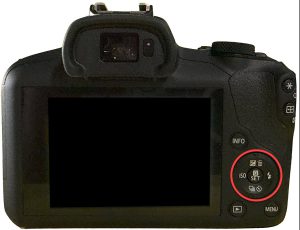
| 5) The “Rocker Switch”
The rocker switch is used to move through the menu’s. You can move Up/Down/Left or Right with the switch. The “Set” button will select an item. To move “Back” to a previous menu, select the “Menu” button. |
 |
||||||||
6) Highlight the “Camera” icon at the top if it is not currently selected using the controls as detailed in item #5. |
|||||||||
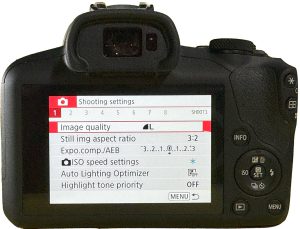
| 7) Shooting settings – Page 1
Select the “SET” button in the rocker switch to enter the camera settings menu. This menu consists of 8 pages of settings. Select page 1. The verify the following settings:
|
 |
||||||||
| 8) Shooting settings – Page 2
Verify the following settings:
|
 |
||||||||
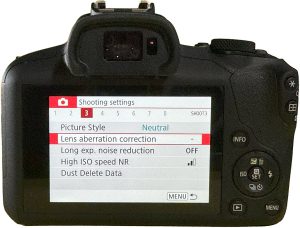
| 9) Shooting settings – Page 3
Verify the following settings:
|
 |
||||||||
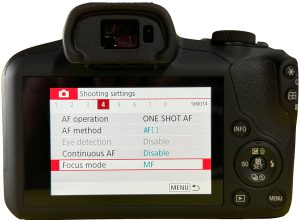
| 10) Shooting settings – Page 4
Verify the following settings:
|
 |
||||||||
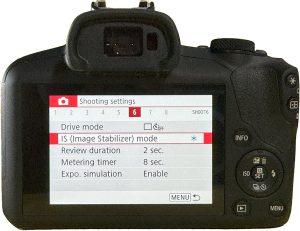
| 11) Shooting settings – Page 5
Verify the following settings:
|
 |
||||||||
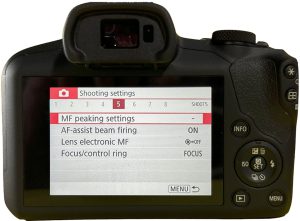
| 12) Shooting settings – Page 6
Verify the following settings:
|
 |
||||||||
| 13) Shooting settings – Page 6 – 7
*NOTHING TO SET* |
|||||||||
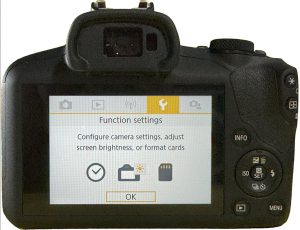
| 14) Function settings
To go to function settings:
|
 |
||||||||
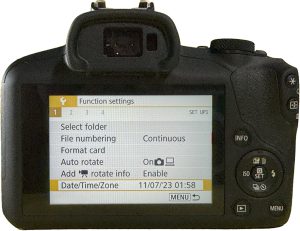
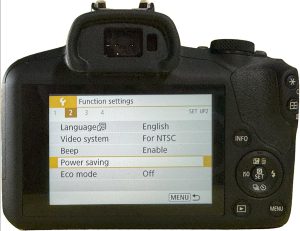
| 15) Functions settings – Page 1
Verify the following settings:
|
 |
||||||||
| 15) Functions settings – Page 2
Verify the following settings:
|
 |
||||||||
| 16) Functions settings – Page 3-4
*NOTHING TO SET* |