Perfect Match™
Customization
Many parts of Slabsmith are customizable. This page is for Perfect Match™ customizations.
“Perfect Match™” customization topics
Preferences
Accessing the Perfect Match Preferences
Select “File | Preferences” then select the “Perfect Match tab” at the top of the window.
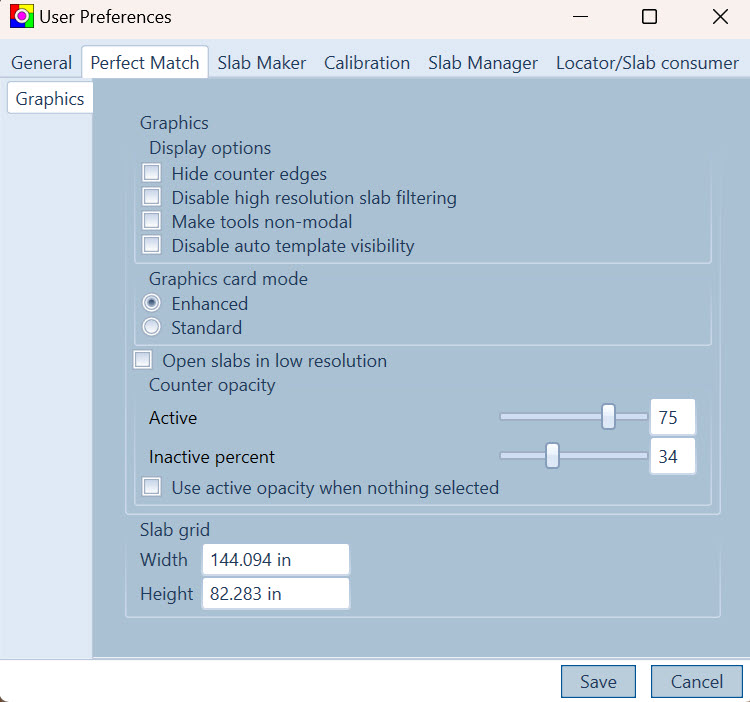
Display options
Hide counter edges
Turns off the edges on the template in the right side preview window.
Disable high resolution slab filtering
By default Perfect Match smooths the pixelation when zooming in closely on a slab. If this is checked it will it will disable pixel smoothing and show the exact pixels in the slab.
Make tools non-modal
Each of the layout tools in Perfect Match has a modal property. If a tool is modal, it stays active until another tool is selected, or the {Esc} key is selected. Selecting this preference will make all tools non-modal. In other words, after performing an action with a tool, you will have to reselect the tool to do the same action a second time.
Disable auto template visibility
By default, when there is more than one template loaded into Perfect Match, it automatically shows only the template that is currently selected in the right side preview window. If this box is checked, all template will always show in the right side preview window.
Graphics card Mode
There are two choices, “Enhanced” and “Standard” graphics. With a good graphics card you should use the Enhanced option. If you are having trouble seeing the slab on the right side preview window, you may need to select “Standard”.
Open slabs in low resolution
If this is checked, Perfect Match will load medium resolution slab images. These images do not display as much detail, but if you are using a slow computer or you have many slabs loaded, this can improve the speed during the layout process.
Note: You can toggle between high and low resolution slab at anytime within Perfect Match by selecting the icon in the toolbar that looks like this: ![]()
Counter opacity
This controls the transparency of your templates. 100% would be opaque, 0% would be clear.
You can set the opacity individually for both the Active (the currently selected template) and the Inactive (all other templates)
Use active opacity when nothing selected
If this is checked, and no template is selected, the templates will display using the the Active opacity. Otherwise they use the Inactive opacity.
Slab grid
When slabs are imported they are automatically placed in a grid relative to the aspect ratio of the window. The grid is based on the Width and Height in this section. Typically you should set the to values a little larger than your largest slab.
Customer Sign-off Sheet
The Sign-off sheet is available in Perfect Match or the Layout Viewer v2023.10+ and provides a way to create a sign-off sheet for your customer.
To print or create a pdf of the sign-off sheet, select the sign-off sheet icon from the top menu bar: ![]()
The sign-off sheet includes a picture of the final layout and optionally pictures of each slab in the layout along with the countertop positions and any notes on the countertops.
The sign-off sheet will always include a top view of your finished layout, but if you place the layout into anything other than a top view on the right screen, it will also include an image of the 3D view on the sign-off sheet.
Customer Sign-off sheet customization
There are two areas of the sign-off sheet that are customizable.
-
- The logo in the top right corner of each sign-off sheet
- The disclaimer text at the bottom of each sign-off sheet
To customize either of these areas, select “Open customization folder” from the right-click menu. This will open the folder with the customizable files.
To replace the default logo:
Create a .jpg of your logo and name it “SignoffLogo.jpg” then copy it over the same file in the customization folder.
The .jpg can be a maximum of 4″ x .75″
To replace the default disclaimer text:
Edit the text file called “SignoffDisclaimer.txt” in the customization folder. You can access the customization folder from the Sign-off sheet icon in the toolbar.
Slab property tooltips
When hoving over a slab ID in Perfect Match properties window, you will see a tooltip with properties of the Slab. This tooptip can be customized to show whatever slab properties you wish to see when hovering over the slab ID.
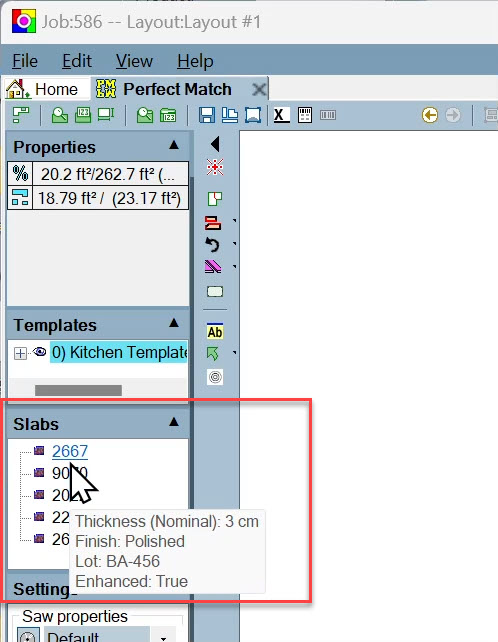
How to customize the tooltip
The tooltip is customized by modifying a special view in the Slabsmith Database Administration program.
- Start the “Slabsmith Database Administration” program
- Select the “Views” tab on the left.
- At the top of the page, in the “Slab views manager” section, select “JobSlabView (internal)” from the drop down list.
- Check all boxes for the properties you wish to see in the tooltip. (uncheck those you do not wish to see.)
- You can change the order by dragging the properties up and down in the list with the chevron on the right side of each property.
- When you have everything checked and in the correct order select the “Apply” button.
- Close the Admin program.
If you have Perfect Match open, restart it and your customized tooltip should now be working.