Light Stands
fabrication
Instructions for fabricating a Slabsmith flash stands
Flash Stand Essentials
The photostation requires two flash stands, one on the left, and one on the right. The stands should be placed symetrically about the photostation A-frame.
The flash should be free-standing to allow the flash to be repositioned during intial setup. After the final position has been determined, then the flash stand may be bolted to the floor.
Instructions for locating the flash stands can be found on the photostation layout page.
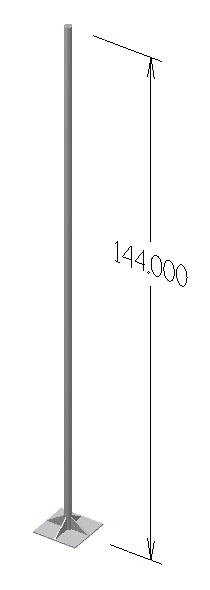
Basic Flash Stand
Flash Stand
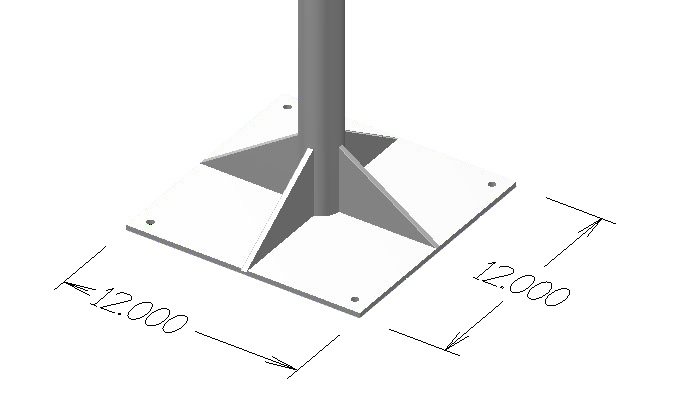
Stand base detail
Flash Stand Fabrication
Simple flash stand
A simple flash stand is just a 1″(25mm) (outside diameter) vertical pipe welded to a base. This is what is detailed in the drawings above and it works well.
The stand should be approximately 12′ (3.6m) tall. If the lights will be substantially further from the A-frame than 17′ (5m), you may need to make the pipe even higher. The further the flashes are from the A-frame, the higher the top lights need to be.
Stonger flash stand
If you wish to make a stronger flash stand than the simple flash stand above, please keep in mind you still need the 1″(25mm) pipe to be accessible near the floor for the bottom flash.
An example of a stronger flash stand can be seen in the images below.
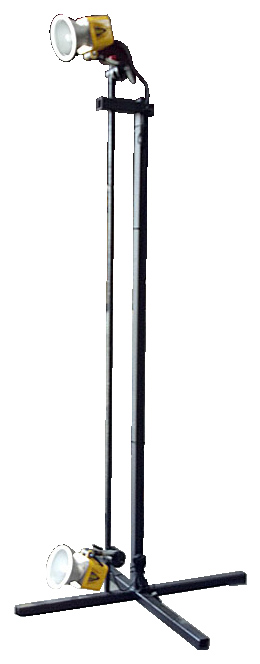
Flash & Stand Assembly
Full Assembly Example
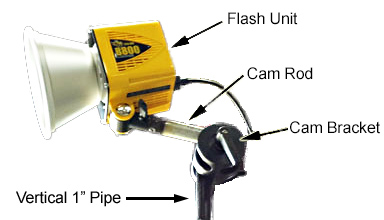
Assembly Detail
Assembly Notes
The flash and stand assembly consists of 4 items:
Flash stand
The flash stand fabrication is discussed above.
Cam Bracket
The cam bracket attaches the flash unit and cam rod to the flash stand. It also provides the ability to adjust the position of the flash unit. The cam bracket accepts multiple sizes of pipe or rod. The cam bracket and flash units are purchased from Paul C. Buff.
Cam Rod
The Cam Rod fits between the flash unit and the cam bracket. The cam rod must be 5/8″ (15mm) on one end to fit into the flash units receptacle. The other end of the cam rod can be between 5/8″ and to 1″ (15-25mm) to fit into the cam bracket.
The cam rod can be as simple as a 5/8″ threaded rod. You can also turn one end of a 1″ rod down to 5/8″(see picture below).
The recommended length is 24″ (600mm) or longer to allow for greater adjustment of the flash unit position.
Flash Unit
The cam bracket and flash units are purchased from Paul C. Buff.
Flash Stand Installation Notes
Flash placement on the stand
The position on the floor is detailed on the photostation layout page of this web site. The position of the flashes on the stand is detailed here.
Lower flash – In general the lower flash unit should be as close to the floor as feasable. The idea is to make sure you are shining light under the slab. This helps with auto-slab separation from the background.
Upper flash – The upper flash is typically 11-12′ (3.4-3.6m) above the floor. If you are having trouble getting good lighting on the top of the A-frame during calibration, your top lights may need to be higher.
Initial setup
When setting up the photostation for the first time, you should NOT permanently affix the flash stand to the floor until after the first good calibration has been completed. The final position of the flash stand can only be determined during calibration.